Outlands Scribes Handbook

Achievements of Arms are one of the more complex bits of heraldry that scribes have to deal with when making award scrolls. As such, a number of people find them somewhat confusing, particularly as there are so many rules for how they should be drawn. The first section of this chapter answers a number of basic questions about achievements, and their use on scrolls. The second section covers the specific elements that make up an achievement of arms, and how they are used together in the Outlands.
What is an achievement of arms, and why do we use them?
An Achievement of Arms is the formalized display of an individual's Arms on a scroll, including symbols of rank, which the recipient has earned the right to bear. The achievement of arms shows not only someone's Arms, but also provides some symbolic information about the awards that a person has received. Without knowing anything about the person, you can tell a number of things about someone's rank in the Society just by their current achievement of arms.
The reason for using an achievement with new Awards, Grants, or Patents of Arms is that these awards include some sort of change to the recipient's armory - even if it is just a change in what it is called. Anyone in the Society can register a device, but only those with an Award of Arms carry "Arms". Our scroll texts reflect this, and since the Crown is awarding or granting the right to bear a specific set of arms, these arms need to be depicted on the scroll as well as blazoned in the scroll text.
To distinguish the level of award being given, different elements are included with the full achievement of arms. The styling of the achievements of arms in the Outlands is based on a combination of real world heraldic practice, and SCA tradition going back to our days as a principality.
Which awards show up in an achievement?
Preferably the achievement should show only those elements appropriate to the award being given. Alternatively the achievement may include the highest level of armigerous award that the recipient has attained. For example, if you are doing a Grant of Arms scroll for a knight, preferably use the grant level achievement, or you could include all elements appropriate for knighthood (either highlight just the award being given, or include the whole enchilada).
When should I include an achievement on my scroll?
Any time a person with registered arms receives an award which newly conveys an armigerous rank (Award, Grant or Patent of Arms) that they did not previously possess, an achievement of arms should be used on the scroll. Not every scroll of a given level will require an achievement.
Final Award of Arms scrolls must have an achievement, but other awards which convey an Award of Arms, such as the Stag's Heart, are most often given to people who already have received an AoA bearing award. Because they are not getting a new level of award, it is not necessary to include an achievement. If an achievement is included on the scroll space must be provided for the blazon and for the herald's confirmation of arms.
If the recipient does not have registered arms then you may omit the reference to personal arms or you make the scroll a promissory and include the phrase "We further charge [him/her] to consult with Ourselves and Our heralds to determine suitable and unique arms,".
Which of these you do depends to a large extent on the recipient of the award and the wishes of the Crown. Please consult with the Kingdom Scribe when deciding how to handle this.
If the scroll is a back scroll, and therefore not a surprise to the recipient, then ask him or her what they would prefer to do. Some people have no interest in ever registering Arms, so giving them a promissory wouldn't be the best choice. Others are in the process of registering a name or device, and may just be waiting for the heraldic submission process. In this case, if the recipient is reasonably certain that their device will pass, perhaps a final scroll could be made including an achievement with a blank shield, and a space to write in the final blazon. Be very careful of taking this approach however, as the blazon (verbal description) of a device is often changed when it is registered, and it could wind up being much longer or much shorter than you expected. It is very difficult to guess at the amount of space that will be required for the blazon. Do not make the decision on how to handle this situation on your own; please consult with the Kingdom Scribe.
The achievement doesn't fit in with the style of illumination that I'm using on my scroll. What should I do?
You still must include the recipient's arms on any scroll that would normally require an achievement. If you are doing a Middle-Eastern style scroll, then the western European style of achievement shown here will not fit in with your illumination. Rather than having a glaring inconsistency in your illumination, try to design a way to display the recipient's device in such a way that it fits in with the style of illumination that you are using. You do not need to use all of the elements normally used as part of the achievement, but it is best if you could somehow integrate them. For instance, on a Celtic scroll, you can use zoomorphics animals as supporters, and display the arms on a roundel rather than an escutcheon. You could design a knotwork wreath with laurel leaves to surround the device if appropriate (for example, on a Laurel scroll).
This is where your creativity can come into play, so take advantage of the opportunity! Consult with the recipient if the award is for a back scroll, but don't be surprised if they tell you to "just do whatever looks good to you"; after all, you are the scribe.
Important Notes!
Remember that any time an achievement of arms is used, you will need to include the recipient's blazon in the scroll text, and the scroll will need to be signed by the current White Stag Principal Herald. You will also need to include the herald's Confirmation of Arms. Arms may not be portrayed on a scroll unless they are registered with the College of Heralds. The Kingdom Scribe will usually check this prior to making an assignment.
Achievement of Arms for the Outlands
|
Crest |
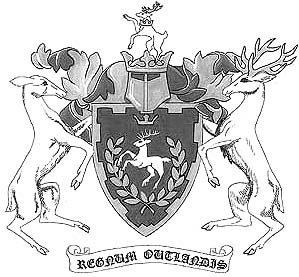 |
See Pelican Achievements Under Scroll Texts for Achievements using Torse and Chapeau |
Elements of an Achievement
An achievement of arms can consist of the escutcheon (shield) emblazoned with the arms, and any of the following: the helm, mantling, torse, chapeau, coronet, crest, and supporters. There are also several different items that may be drawn encircling the shield, if desired and appropriate for a given award. This may be any one of the following: a belt, chain, ribbon, laurel wreath, or chaplet of roses. These elements may be used under the constraints imposed by the Reserved Charges and the Specific Achievements for each award, listed along with the scroll texts in the Scribe's Handbook. The arms of the recipient of the scroll are always the most important element of the achievement. It is important when designing an achievement of arms that the arms be displayed clearly, and for the various elements to complement each other.
Escutcheon
Arms may be displayed upon an escutcheon (shield-shape), lozenge (diamond-shape), or roundel (circle). In late and post-period English heraldry, the lozenge was reserved for women, but it was apparently also sometimes used in Spain for the arms of men. As far as the SCA is concerned anyone may use it. By the same token, a woman may use the shield shaped escutcheon, and it is the default for achievements in the Outlands. The roundel may be more appropriate for non- European or early period personae, as in Japanese mon. The shield may be tipped with the helm atop its upper corner as is often shown in period achievements, as permitted by the award. Be careful of tipping the shield if the device in question has an ordinary such as a bend or saltire. The type of ordinary may be unclear when it is drawn at an angle (a saltire looks like a cross, a bend looks like a fess, etc.) Of course this didn't stop such displays from being used in period, so just use your artistic judgment as to what looks best, and what sort of display you would like.
If the award has been given prior to the scroll being made, and the recipient is aware of the scribe's work, then the scribe should ask if the person wants their arms displayed on an escutcheon, lozenge, or roundel. If you do not know or the person does not care, the escutcheon is to be used. When the word "shield" is used throughout the rest of this guideline, it is a generic term for any of these three.
The shape and dimensions of a lozenge, escutcheon, or roundel are left to the artistic discretion of the illuminator. Shield shapes in period achievements vary considerably. Be wary of some of the more fanciful shapes used in Victorian heraldry however. Try to base the shape on what actual shields looked like, and on what shape best suits the device that you are portraying.
Achievements of Arms for Women
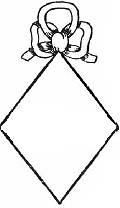
In most cases, historically the only time a woman would have had her own achievement of arms would be if she were an unmarried heiress. Some women in period did use their own family arms (as opposed to their husbands'), particularly on personal seals. A lozenge was typically used in late period English heraldry for the display of women's arms. Instead of a helm, a ribbon was often shown emerging from behind the top point of the lozenge in modern heraldry, although the ribbons were more free-form than this in period. This knot is most similar to the "Hungerford knot" which you can find in heraldry books, including the Pictorial Dictionary of Heraldry, a great resource for any heraldic artist. When using ribbons in an achievement, you can may them any color. Do not use white, unless the recipient of the scroll is a Knight or Master of Arms.
Within the Society women may display their Arms however they prefer, subject to the guidelines followed in the Outlands. Again, you should generally use the escutcheon unless you know that the recipient would prefer to display her arms on a lozenge. For correct usage of the lozenge consult the Kingdom Scribe.
The Colors
In heraldry all of the colors that are used to make devices are collectively referred to as "tinctures". The tinctures can be divided into two groups. There are two metals: argent and Or. Argent can be represented by white or by silver. Or can be represented by yellow or gold. There are five heraldic colors: sable (black), azure (blue), vert (green), purpure (purple), and gules (red). Just to confuse the issue, when it comes to achievements of arms, there is a special meaning to the word "colors", which is used to refer to the colors that items such as the mantling and torse should be painted. The "colors" of a person's arms are the principal color and the principal metal.
The Metals
In heraldry, there are two metals, "argent" and "Or". Each of these can be represented by either a flat color (white or yellow), or by a metallic color (silver or gold). You may use both silver and white paint in a device to represent "argent"; for example, a white flower with a silver sword. Likewise, you may use both yellow and gold paint to represent "Or"; i.e. a gold key within a yellow bordure. This is all subject to the artistic interpretation of the illuminator.
The Helm
Both men and women may use the helm, as they desire and as permitted by the award. Helms are used only on Grants of Arms and Peerage level scrolls. Regardless of the level of the award, helms are not generally used when the device is portrayed on a roundel or lozenge. On a lozenge a ribbon is drawn emerging from behind the top point of the lozenge, instead of a helm. Helms may be in profile, three-quarter view, or full face, whatever looks best with the rest of the achievement. Period types of helms should be used rather that the stylized, more modern versions. They should be drawn seated firmly on the shield, not floating in the air above it. Only a single helm will be used in each achievement. It is traditional in later period heraldry to color the lining of the helm red in those places where it can be seen (eye slits, and bottom edge of some designs), but many period achievements do not do this. When possible, match the helm to one appropriate to the recipient's persona or to their personal helm. The size of the helm should be proportional to that of the shield, as if they were real items to be used by the same person. The color of the helm is restricted by the award level. A GoA level achievement uses a black helm. Peerage level is indicated by using a silver helm, and Royal Peers are indicated by using a gold helm.
Mantling and Torse
Mantling is a sort of decorative cloth draped over the top of the helm, with numerous folds and artistically dagged edges. Mantling will be used when a helm is used and will not be used when a helm is not. A torse is a headband of twisted cloth, used to hold the mantling in place at the top. In heraldry books you will often find the torse referred to as a "wreath". We avoid calling it that in order to avoid confusing it with the laurel wreath, which is used as a symbol of the Order of the Laurel. If a crest is used, the torse generally makes a dividing line between the top of the helm and the base of the crest. A torse should always be used with mantling unless there is a coronet or chapeau or chaplet to take the place of the torse. The torse shall be alternating metal and color, which are the principal color and metal of the recipient's Arms. Peers can line theirs with ermine and a royal peer may use any "species" of ermine (counter-ermine, erminois, etc.).
Mantling goes over the top of the helm; it does not hang from the torse. Therefore the top portion of the helm, when it is visible, should be painted in whichever color is being used to represent the "outside" of the mantling. When drawing the mantling, it is generally folded over itself revealing both the main and lining colors. Where the mantling is drawn right next to the shield, try to have the "color" part of the mantling touching the "metal" part of the arms, and vice versa. While this is not necessary, it helps to provide good contrast.
Coronet, Chapeau, or Chaplet
For certain awards, the torse may be replaced by a coronet, chapeau or chaplet. A coronet must be drawn according to certain conventions based on which award it is for. For a court barony, the coronet is drawn as a band supporting six pearls (only four of which are drawn). For a county, the coronet is drawn with an embattled upper edge. For a duchy, the coronet of strawberry leaves is used. A chaplet is a wreath of roses, used as a symbol of the Order of the Rose. It can either be drawn encircling the top of the helm, to replace the torse, or encircling the shield as part of the achievement. A wreath of laurel leaves may be used to replace the torse, as a sign of the Order of the Laurel. A chapeau is an heraldic "cap of maintenance" - a stylized hat which is red with an ermine lining. It is used to symbolize the Order of the Pelican. Please see the specific scroll texts for each award for sample achievements using these variations.
Achievements without a helm
No crest, mantling, torse or chapeau may be used without a helm. Achievements without a helm will often be shown with a ribbon or chaplet around the shield. As mentioned previously, when using a lozenge, a true-lover's knot may be drawn over the top of the lozenge. Supporters may be used, if allowed. A coronet may be used if appropriate. The coronet should rest firmly on the shield, not float in the air above it. In period, a coronet without a helm was generally drawn as if it were as wide as the shield, which is different from the general practice of making the parts of the achievement all proportional to each other. If using a lozenge, or a tilted shield, the coronet should sit down over the point of the lozenge or tipped shield. The bottom of the coronet can be shown curved up slightly. See the specific achievements for each award for appropriate styles of coronet.
Supporters and Compartment
Supporters are allowed, but they are not registered with the College of Heralds. They will only be used on scrolls for peers. It would be best to consult with the recipient of the scroll, if that is possible, before putting supporters on a scroll, as not everyone will want them. See following table for restricted supporters.
Supporters usually consist of one creature, two similar creatures, or two unlike creatures supporting the shield. Period beasts (this includes monsters) or human figures are usually used. A personal or household badge, or a beast from the arms, would be ideal. No out of period objects are allowed as supporters. When drawing supporters, they should be drawn large enough that they can "see" each other across the top of the shield (well, they might be able to see each other if the helm and mantling weren't in the way!). The supporters need to be drawn so that they stand firmly and seem to hold the shield in place; quadrupeds use their forelimbs, birds tend to use one of their feet, and fish vary quite a bit, but generally have their fins supporting the shield. The supporters usually need something to stand on so that they don't appear to be floating in the air.
The compartment is the term for the little hill of land that is generally drawn for the supporters to stand on. This is not required, and is left strictly to the discretion of the artist. Often the compartment is drawn to resemble an appropriate "medium" for the supporters. For example, if you have birds as supporters, you may draw a compartment that looks like fluffy clouds rather than like a grassy hill. Water may be drawn in for aquatic supporters such as fish or mermaids.
Crest
Crests are generally some sort of emblem affixed to the top of the helm. They may only be used by peers. Crests should not be too complex. A single or demi beast, bird, or other charge may be used. No out of period objects are allowed. Any appropriate charge from the arms or registered badge could be used as a crest. Only one crest is allowed per helm; if you are using one of the peerage crests, another will not be added as well. The crest should generally face in the same direction as the helm (i.e. a rampant lion should usually not be shown leaping sideways off of a helm that is facing forward). This is, however, left up to the discrimination of the artist. A crest will not be used without a helm, and will be anchored firmly to the helm, not floating above it. The torse usually hides the joining of the crest to the helm.
Mottos
Mottos will not be used on scrolls of arms as part of the achievement. A person or household may adopt a motto for personal use, but it will not be registered. An appropriate motto can be included as part of the illumination.
Reserved Charges
| Element | Reserved for |
| Black Helm (with torse and mantling) | Grant-Level Awards and above |
| Silver Helm (with torse and mantling) | Peerages |
| Gold Helm (with torse and mantling) | Royal Peerages |
| Any crest or supporter | Peerages |
| Chapeau or pelican as crest or supporter | Pelican |
| Laurel Wreath- any color | Laurel |
| White belt or ribbons | Knight or Master at Arms |
| Chain | Knight |
| Chaplet of roses | Order of the Rose |
| White or Silver Dove as crest or supporter | Outlands Royal Peer |
| White or Silver Stag or Doe as crest or supporter | Outlands Royal Peer |
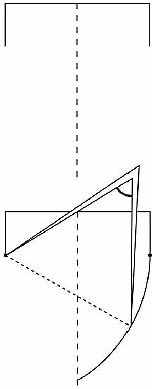
An Easy Method for Drawing a Shield
To draw an escutcheon (shield shape), all you need is a ruler and a compass. First decide how wide you want the shield to be, and pencil in the top line. Find the center, and lightly sketch a center guideline, making it a bit longer than the shield will be tall. Now draw the straight part of the sides, it is usual to make the sides anywhere from 1/5 to 1/2 of the width. To draw the rest of the shield, set the point of your compass at the bottom of one side (where the dots are in the diagram), and place the pencil end at the bottom of the other side. Swing the compass around, and draw an arc that just crosses the midline. Now reverse the compass, and draw the second arc in the same manner. You can vary the shape of the shield quite a bit by making the sides different lengths, Try experimenting on some scrap paper to find a shape that you like before making compass holes in your paper!